Thursday, 31 March 2016

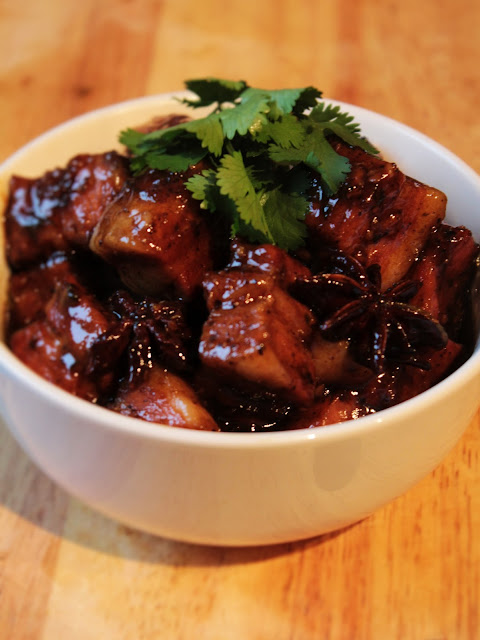
Moo Hong (Stewed Pork)


I've been looking forward to making this sticky, sweet braised pork dish for a while now and it did not disappoint. Moo Hong belongs to a family of similar Chinese influenced, dark coloured stews that also includes khao kha moo (stewed pork leg) and moo paloe (pork braised with eggs). They all share some common ingredients: soy sauce, star anise, long cooking time and fatty cuts of pork but it's down to the consistency and what they're served with that makes for some subtle differences.

Moo Hong uses large chunks of belly pork and is cooked down until you're left with a rich, peppery, sweet and sticky sauce and meat that is soft and unctuous. Although it needs just over an hour to cook it's very easy to make.


For two large portions use:


  • 400g of pork belly, rind removed and cut into inch square pieces. Try to find a piece that is fairly even in thickness and has a good meat/fat ratio
  • half a bulb garlic, peeled
  • a dessert spoon of black peppercorns
  • a small handful of coriander roots or stalks (roots seem impossible to find in the UK)
  • a golf ball size chunk of palm (or light brown) sugar
  • 3 star anise
  • a big splash of oyster sauce
  • a big splash of light soy sauce
  • a big splash of dark sweet soy sauce (I use Indonesian kecap manis)
  • 2-3 cups of water (you may need a bit more)
  • small splash of oil for frying

Make a well blended paste by bashing the black pepper, palm sugar, garlic and coriander in a mortar; by adding the harder ingredients first and adding the softer ones last you should end up with a fairly smooth paste.

Heat a splash of vegetable oil in a deep pan until medium hot. Carefully add in the cubed pork belly and fry for 3-4 minutes until some of the fat has rendered out and the pork is lightly browned. Pour off the excess fat from the pan (there'll be plenty in the dish as the pork cooks down).

Pop in the spice paste and stir well for a moment or two; the sugar in the paste will make the pork sticky but be careful not to let it sit and burn. 

Pour hot water over to just cover the pork then add in the rest of the ingredients (sauces and star anise). The sauce will be dark but very thin. Pop on a lid and lower the heat to a gentle simmer, let the pork reduce and cook down for around 75-90 minutes. Check it and stir gently every now and again, making sure there's still enough liquid; top up with a little water if need be.

The final sauce should be thick and sticky (of a honey- like consistency). Serve with freshly cooked rice and some extra coriander.
Saturday, 26 March 2016

Gaeng Som Cha Om (Sour Curry with Acacia Omelette)


Gaeng Som must be one of the few 'curries' I've yet to touch on; my preference for Northern and Central Thai cuisine means I often overlook dishes from South Thailand, perhaps unfairly. To this end today's recipe and the next will focus on southern Thai food.

Gaeng Som is more soup like than other curries and has a simple and aromatic paste making it an easy dish to pull off. It's sourness comes from a combination of tamarind paste and lime juice. Any combination of crunchy vegetables can feature in a gaeng som but keeping it traditional, I've just used bamboo shoots. A popular addition; acacia omelette (kai jeow cha om) helps to provide a pleasing textural contrast and soaks up some of the broth.

For 4 small bowls use:

  • 200g peeled prawns
  • 200g of drained and rinsed bamboo shoots, sliced
  • 50ml of taramind concentrate
  • juice of 1 lime
  • small handful of peeled Thai shallots
  • small handful of dried red chillies
  • 4 or 5 fingers of krachai (galingale) chopped
  • 1 teaspoon of shrimp paste
  • 2 cups of chicken or vegetable stock
  • a big splash of fish sauce

and for the accompanying acacia omelette follow this recipe

Begin by making the acacia (cha om) omelette, cutting it into squares and keeping warm while you make the curry.
Make the curry paste by pounding the dried red chillies, shallots, shrimp paste and krachai in a mortar, working it until you have a well blended red paste. The krachai will be one of the predominant flavours of the dish whilst the chillies give it it's orangey/red colour.
Boil the chicken stock in a large pan and pop in all the prepared paste, mixing well. Turn down the heat to a simmer.
Add in the bamboo shoots and cook for 2 minutes, then add in the tamarind and fish sauces.
Next in go the prawns- 3 minutes or so for raw, 1-2 for pre-cooked.
Finally squeeze in the lime juice, give everything a final quick stir and stir with freshly cooked rice.
Serve the acacia omelette both in and on the side of your gaeng som.


Monday, 21 March 2016

Gai Tod Pad Nam Prik Pao (Fried Chicken Stir Fried with Roasted Chilli Paste)


It's very rare these days that we would ever buy a takeaway, I've just had way too many identical oil drenched, msg ridden, jam-like, tummy ache laden meals to ever optionally order one then pay through the nose for the privileged. however that's not to say I eat healthy all the time. Like most, I occasionally like deep fried food, I just like my salt, sugar and fat in reasonable amounts and I think takeaway places (by and large) rely on pre made cheap fixes.

Ranting over, when I do want something takeaway like, I'd much rather make it myself, lets face it, as long as you have the ingredients in, you can be eating this quicker than it would take for a takeaway to be delivered. I guarantee this crunchy, spicy, sticky stir fry will satisfy all your takeaway urges!! It differs quite substantially from all the other English written versions of gai tod nam prik pao, this is taken directly from a Thai recipe and is the real thing!

As an added bonus, it's a 2 in 1 dish. If you just want the chicken as a starter/snack, use wings and forgo the vegetables. If it's a whole meal, keep the veggies in and serve with rice.

For the stir fry version for two people use all the ingredients:
For the chicken wing snack version use just the ingredients with a * next to them
  • 4 large chicken thigh fillets, skinned and cut into large cubes or 10 wings, jointed*
  • 1 large onion, peeled and cut into large chunks
  • 2 spring onions, kept in large chunks
  • 4 cloves garlic, peeled and finely chopped
  • a small handful of dried red chillies
  • a heaped dessert spoon of roasted chilli paste (nam prik pao)*
  • a big splash of light soy sauce*
  • a big splash of oyster sauce*
  • a big pinch of brown or palm sugar*
  • rice flour for dredging the chicken (plain flour is ok too, just not as light and crispy as rice)*
  • salt and pepper*
  • oil for deep frying and splash for stir frying*

Season the chicken with salt and pepper, then dredge it through the rice flour, shake off the excess.
Heat a deep fat fryer to 190 degree Celsius or use a heavy pan and watch it carefully.
Pop in the chicken pieces and cook until deep golden and crispy (3-5 mins). Drain on kitchen paper.

Heat a small splash of oil in a wok until hot then throw in the onions and stir fry on a high heat to get some colour. Throw in the dried chillies and garlic and stir fry for a few minutes. Throw in the spring onions and the drained fried chicken.

Add in the roasted chilli paste, coating the chicken well, then the remaining sauces and sugar. Everything should be nice and sticky.

* If you make the wings snack version make the sauce in a wok- heat a small splash of oil before adding the roasted chilli paste, sugar oyster sauce and soy sauce, blend well and put the fried chicken wings in, stirring well so everything is coated.


Friday, 18 March 2016

Pak Mara Pad Kai (Bitter Melon Stir Fried with Egg)


There comes a time when occasionally I have to admit defeat with one of my recipes, when I quite frankly hate it. This is one of those times. Bitter melon is most definitely not for me- although it's supposed to be very healthy for you and I purposely chose the palest ones the market stall had, it still tasted like something that shouldn't be eaten!! My palate just isn't accustomed to bitter as a predominant flavour. 

If you would like to try the health giving properties of pad pak mara kai, here's the recipe...

  • 2 small bitter melons (paler are less bitter supposedly) cut in half lengthways and seeds scooped out, cut into thin slices.
  • 2 eggs, beaten
  • a big pinch of ground black pepper
  • a small splash of light soy sauce
  • a small splash of fish sauce (or a bit extra soy if you're vegetarian)
  • a splash of vegetable oil for stir frying

Heat a wok with the oil until hot. Throw in the bitter melon and stir fry for a couple of minutes until beginning to soften. Push to one side and pour in the beaten egg. Let it set for a moment before scrambling and then mixing all together again. Add in the sauces and pepper and mix well, frying for a couple more minutes before serving.

Tuesday, 1 March 2016

Pla Tod Khamin (Turmeric Fried Fish)


Ahh, poor bonito; fish never look quite so pretty when they've been deep fried whole- I'm not one for removing heads though, I'd much rather keep them whole- plus you'd miss out on the cheeks!

Saturday just gone I did one of my favourite things to do in my free time, wandering round food markets, picking up random things to take home and make things with. I went to Bolton market; I've been there once before and remembered it was a great place to pick up every kind of fish, cut of meat, exotic vegetables and great for local northern produce. It also has a great fresh Thai fruit and vegetable stall, easily on par with any of my usual favourites in Leeds, Manchester and Birkenhead- very reasonable prices too. 

Along with my bonito fish (£5 for a huge fish), some acacia (cha om), fresh green peppercorns (just because I struggle to get them) I also picked up some bitter gourds for a recipe which will follow soon.

There is nothing fancy about the fish- I wanted to cook it in a way that would do it justice, quickly and simply and served it with nam prik seafood (seafood sauce) and some rice. We ate it as you see it here, sharing it between us.

For two people use:

  • a large meaty fish, gutted, scaled and deep slashed cut into both sides
  • several knobbly pieces of fresh turmeric, chopped
  • half a bulb of garlic, peeled and chopped
  • a lot of vegetable oil for deep frying
and if you fancy making the 'sauce seafood' to go with it- here's the link within another of my earlier recipes... 

Heat a large, deep wok full of vegetable oil until hot. Very, VERY carefully slowly slide the fish in and allow it to develop a deep golden crispiness- it will need to be carefully turned over half way through the cooking. It will depend on size but mine took about 10 minutes.

Gently lift out, use two spatulas (an extra pair of hands helps) and drain on kitchen paper.

Still in the hot oil, drop in all the chopped turmeric and garlic and deep fry for around 2 minutes- stirring regularly until you can see the garlic is a light golden brown and everything is slightly crispy. Scoop out with a sifter and sprinkle over the fish.