Monday 28 December 2015

Gaeng Taipo Pla (Morning Glory & Fish Curry)


Hi there everyone, firstly I hope you've had a lovely Christmas and/or some time off to relax and spend with friends and family. Let me start by apologising for my absence. I would love to say I've been having wild parties and gorging on food for the last 10 days or so but that isn't the case; in fact Christmas more or less has been thrown out of the window this year. I've been incredibly sick with a clostridium difficile infection, which developed after a course of antibiotics. I'm not home and dry yet but after a week of being rather poorly, I am starting to feel more human and am eating again. I'm also currently banned from the kitchen while infectious and on a very light diet; although am trying some Khao Man Gai (fatty chicken rice) tonight.

What with the floods/clean ups and power cuts and now this horrible bug it feels like I've been away for long enough, so it's high time to get blogging again.

This is a recipe I made a couple of weeks back that was planned during the time we had the floods; remember the swordfish I had to throw away? The week after, I bought some less expensive, but delicious steaks of hake and finally made the curry I had planned; Gaeng Taipo Pla.

It reminded me of some of the dishes we ate while we were in Malaysia in the summer, there's certainly a lot of common ingredients. It's a nice easy one to do and if you're sick of turkey and meat right now as a lot of us are after the Christmas festivities, it's a great dish- hot, sour, pungent and healthy with lots of crunchy morning glory.

For two people use:


  • Two fish steaks (I used hake but any firm fish will work well)
  • A very big handful of morning glory, trim off ends then cut into inch long pieces
  • 200ml or 1/2 a can of coconut milk + water to make up to 400ml
  • 75ml of tamarind concentrate
  • A level tablespoon of red curry paste (I use Mae Ploy brand)
  • A big splash of fish sauce
  • A walnut sized chunk of palm sugar/ light brown sugar
  • Juice of a large lime
  • A few lime leaves, ripped up into small pieces
Heat the coconut milk in a wok over a reasonably high heat, gently stirring every now and again until the oils begin to separate from the coconut milk. When they do, add in the red curry paste and fry until well mixed, fragrant and the red oils can be seen. Now pop in the fish sauce, tamarind, sugar and lime leaves along with the additional 200ml water. After all are well mixed, gently pop in the fish steaks and let them slowly cook in the sauce, carefully turning over if needed after a few minutes to allow the fish to cook fully.

When you are happy the fish is cooked, use a slotted spoon or fish slice to carefully lift the fish out and put briefly to one side. Back to the pan of bubbling curry, add in the lime juice and morning glory, stirring well, cooking for only a minute or so until the morning glory is just wilted. 

Serve the curry with a fish steak on top along with freshly cooked white rice.

Wednesday 16 December 2015

Goong Pad Sot Makham (Prawns Fried with Tamarind Sauce)


With Christmas just around the corner, it's the time of year when special dishes like this one are in store. I picked up a huge bag of king prawns from our local Asian food store which was much more economical than buying the tiny bags from regular supermarkets. Just a note on the prawns- I recommend using the prawns with the shell on. The sauce seems to stick to it so much better- however if you can't get shell on, don't get too hung up about it. Depending on your persuasion you can either chew the prawns, shell and all or get hands on and peel and suck the prawns as you go. 

This is a quick one to make, there is a bit of time needed to make the toppings but it's not onerous. My husband was a bit worried when I was making this that it would be too sweet; neither of us are particularly keen on sweet savoury dishes and I have used less sugar in my recipe than you may find in other versions of this dish. As ever with Thai food, you should always adjust the food to suit your own tastes. The end result is a thick sauce perfectly balanced between sour salty and sweet.

For two people, use:

  • Two big handfuls of raw king prawns (shrimp) ideally with shell on
  • 2 spring onions, sliced
  • 3-4 small red chillies, sliced
  • 1 large red chilli, thinly sliced
  • 5/6 cloves garlic, chopped
  • 4 shallots, peeled and thinly sliced
  • 1/2 small onion, chopped
  • Around 75ml of thick tamarind concentrate
  • Around 100ml water
  • A big splash of light soy sauce
  • A small splash of Thai fish sauce
  • A tablespoon of palm sugar (or light brown sugar)
  • Vegetable oil for frying
  • Optional- lettuce leaves for serving on, coriander sprigs etc. 


Heat a large splash of oil over a medium heat and throw in the shallot slices. Gently fry for 4-5 minutes or until they become light golden. Add in the garlic and continue frying everything together until golden and crisp. Scoop out and drain on kitchen paper.

Heat up the same oil again and when hot, fry the chopped onion, until softened. Pop the small chillies, sugar, tamarind, water, soy and fish sauce into the pan, stirring until the sugar is all dissolved, and the sauce is reduced by around half. When the sauce is reasonably thick, pop in the prawns and cook in the sauce until pink (about 3-4 minutes).

Pour the prawns and sauce onto a serving plate (with a lettuce leaf bed if you wish) sprinkle over the large sliced chilli, crispy shallots/garlic and the sliced spring onion.

Saturday 12 December 2015

Pad Pla Cha (Sizzling Fried Fish)


The last week has certainly been a chaotic one- in our corner of the world we've had horrendous amounts of rain which led to wide scale flooding in our city centre, followed by our substation getting flooded, blowing up and widespread blackouts. It really was strange to have 3 days without electric, internet or even phone signal; most people also use digital phones so even a basic phone call using a landline was out. Consequently, cooking in the dark at friends and family's houses (we don't have gas here, only electric so we had to borrow) using up whatever food we had that hadn't yet gone off did not make for a productive week to run a food blog- all the shops were shut due to flood damage and having no power and even the museum where I work (unfortunately next to the river) had suffered from the flood waters so the beginning of week there was much cleaning up to be done.

This recipe for pad pla cha was made last week before all of this even began and has been waiting to get uploaded for a bit. The 'cha' part of the name describes the sizzling noise made by stir frying at high temperature, there are many variations on pad cha recipes, this is just one! I find deep frying the fish holds it together and helps absorb the flavours of the sauce. It has a couple of specific ingredients- the green peppercorns and the krachai root which give it a unique flavour.

For two people use:

  • 2 small fillets of fish (I've use basa- a type of catfish)
  • a big handful of flour
  • 1 long Asian aubergine/ 3 Thai, sliced
  • a handful of green pea aubergine
  • a tablespoon of green peppercorns
  • a heaped teaspoon of red curry paste (I use Mae Ploy brand)
  • 2 small red chillies
  • 4 cloves garlic, peeled
  • 1 large red chillies, sliced
  • 2 fingers of krachai (fingerroot), peeled and finely chopped
  • a large handful of sweet Thai basil (bai horapha)
  • a large splash of oyster sauce
  • a large splash of light soy sauce
  • a small splash of fish sauce
  • vegetable oil for deep frying and a splash for the stir fry

Make a rough paste in a pestle and mortar with the small chillies and garlic, set aside. Cut the fish into thin slices and coat them in the flour, dusting off the excess. Heat a pan of oil to a depth of at least 3 inches and when hot, deep fry the fish until crisp and light golden in colour, scooping out and draining onto a paper towel. Set aside briefly.

In a wok, heat a splash of oil over a high heat and briefly fry off the chill/garlic paste and the red curry paste for around 30 seconds until fragrant. Next pop in the sliced aubergine and fry for a few minutes until slightly softened. Next in go the pea aubergines, green peppercorns, krachai and sliced red chilli and fry for just a minute. Now pop in the breaded fish and be much more gentle now, stir through and add in the remaining sauces (soy, fish and oyster), coat everything well. Finally, turn off the heat and throw in the basil leaves, briefly stirring through. 

Serve with freshly cooked rice. 

Sunday 29 November 2015

Moo Ping, Som Tam & Khao Nieow (Grilled Pork Skewers, Papaya Salad & Sticky Rice)


If I was to ever find myself on death row and had to pick a final meal, it would be this. Everything about these three relatively simple components equals complete perfection. Ever so slightly charred, grilled pork skewers (moo ping), juicy and rich with garlic and black pepper with a hint of coconut. My long time favourite, som tam (papaya salad) with it's addictive crunch and astringent sour and hot flavours and to round the whole thing off and soak up all the flavours; sticky rice (khao niew) eaten by hand. It's no wonder they're regularly found in this combined set in Thailand.

Isaan (or north eastern Thai) food is for me the pinnacle of Thai food. The use of fresh herbs and strong pungent flavours, paired with grilled meats, salads and less use of creamy/soupy based dishes equates to food heaven for me.

Doing these dishes also gave me chance to try out and show off some of my new kitchenware- the large terracotta mortar and wooden pestle (informally known as a pokpok) used for gently bashing ingredients- ideal for som tam and the woven sticky rice holder- which I lined with cling film before putting the rice in. It keeps the rice warm and finished off the cooking so the rice is the proper consistency at serving.

For the moo ping skewers (this makes 6 large) use:


  • 3 pork steaks (ideally with some fat, though cut off any large rinds), cut into thin pieces
  • a small handful of coriander stalks or roots
  • a teaspoon of black pepper
  • 4 garlic cloves, peeled
  • a big splash of oyster sauce
  • a big splash of light soy sauce
  • a small splash of fish sauce
  • a big pinch of brown or palm sugar
  • 100ml of coconut cream (the thick part off the top of a can)
  • 6 bamboo skewers

In a mortar (a regular granite one, not the terracotta one above) bash up the black pepper, garlic and coriander stalks into a paste. Add this to a bowl along with the pork pieces. As a rough guide for the pork, I cut each steak into three strips lengthways and then thinly sliced each strip across (roughly 4mm wide.) I ended up with lots of small pieces. 
Into the bowl add in the three sauces and sugar, mix well and leave to marinade for around an hour.

In the meantime, soak the skewers in water (a tall flower vase works well!) so when you grill them they won't burn.

If you make a som tam salad or are doing sticky rice, now is the time to prepare the ingredients and get them ready.


Here's the link, Som Tam Recipe - it was the second ever recipe I did for this blog!

For the sticky rise it's best to just follow the recipe on the packet/ bag that you're using as it'll require a fairly specific quantity of water.

Back to the pork. Take the skewers out of the water and begin to thread the meat onto the stick; the meat strips should sit perpendicular (across) the skewer, not lengthways along it. Skewer it through the thinnest edge so that the maximum amount of meat is exposed to the grill and is easier to pull off when eating. Put plenty of meat on each skewer and pack it down; don't worry about the cooking- it's thin pieces so it will cook through.

Heat the grill medium-high and place onto a wire rack or as I did, on a baking tray with the edges of the bamboo skewers resting on either side of the tray so the meat sits clear of the bottom. The grilling takes about 10-15 minutes and twice during the cooking, take the skewers out and baste them with a light coating of the coconut cream. They're ready when they're a little smoky, have a little bit of light char and and golden brown.

Serve with the som tam and sticky rice- you'll thank me!


Wednesday 25 November 2015

Khao Moo Tod Gratiem ( Rice with Crispy Pork & Garlic)


So along with the Yam Makeua Yang (grilled aubergine salad), I served this little beauty- khao moo tod gratiem- marinated pork, fried until crisp, along with freshly cooked rice, a runny fried egg and crispy fried garlic. This dish makes no pretense- it's totally unhealthy but as a treat, it's a cracker. You can find these classic one plate dishes served up at food carts up and down Thailand- they're popular for a reason!

For two people you'll need:


  • Two bowls of freshly cooked white rice
  • Two fried eggs (fry lightly and leave on kitchen paper in a warm oven)
  • Around 300g of lean pork shoulder, cubed
  • 3 cloves garlic
  • teaspoon of white peppercorn
  • small splash of fish sauce
  • big splash of soy sauce
  • big splash of oyster sauce
  • 1/2 bulb of peeled and chopped garlic
  • a big splash of vegetable oil for frying
  • token gesture sprig of coriander!
Use a mortar to pound up the peppercorns and the 3 cloves garlic into a rough paste. Put this with the cubed pork into a bowl and add in the three sauces. Leave to marinade for about an hour. 
In the meantime, fry the garlic. Heat the vegetable oil in a wok on a low-medium heat and gently fry the garlic until a light golden brown (takes 6-10 minutes). Then scoop out and drain onto kitchen paper, retaining the oil.

Next cook the rice and keep covered until ready to serve.

Finally, heat the flavoured garlic oil and when hot, carefully spoon in the pork. Fry on a medium heat until the pork is crisp and dark golden brown.

Plate up over the rice, pop on the fried egg and sprinkle over the crispy garlic. Serve with some green stuff!

Friday 20 November 2015

Yam Makeua Yang (Grilled Aubergine Salad)


This is a very healthy dish, which is fine but we ate it along with deep fried garlicky pork- khao moo tod gratiem (which will be the next post) so all was good! You could say this was the vegetarian brother of laab (chopped meat salad) as there's a lot of similar herbs and flavours used but none of the guilt. There's beautiful smoky flavours from the charred aubergine which goes great with anise and mint in the herbs and salty/sour sauce.

This doesn't take too long to make and the standard purple mediterranean aubergine does the job just fine in this case. Small Thai eggplants would be way to costly to make this dish in the UK due to how many you'd need. Long thin Asian eggplants/aubergines are another good (and more affordable option).

For a bowl of Yam Makeua (which is a perfect side dish for 2) use:

  • 1 large purple aubergine/ 3 thin Asian/ 8 Thai
  • 4 shallots, peeled and sliced
  • 2 spring onions, sliced
  • 2 red chillies, sliced
  • 2 boiled eggs (optional but always nice)
  • a large handful of fragrant herbs- I've used sweet Thai basil (bai horapha) and mint
  • juice of 1 lime
  • a big splash of fish sauce or light soy sauce
Put your aubergine(s) on a baking tray and grill whole, on a high heat until the skin is blackened and the aubergines wrinkled. It took me about 10 minutes, it'll take less for the smaller/thinner aubergines. You can also toast the aubergine directly over a  flame but it will get very smoky and sets the smoke alarms off indoors so best to save this method for outdoor cookery.

As soon as the aubergine(s) come out of the grill, cover the tray with a tight layer of cling film (which will vacuum itself to the hot aubergine) but once cooled a little will allow you easily peel off the skin.

Discard burnt skin and cut the smoky flesh into strips. When cool, mix in a bowl along with all the other ingredients, serving the boiled eggs on the side.


Monday 16 November 2015

Giew Nam (Dumpling Soup)


What could be better than fragrant pork stuffed wontons in a savoury broth topped with crispy fried garlic? I love this recipe and it's a firm favourite in our house. It doesn't take as much time to make as you might expect and is just what you want on a dark wintery evening. There's a clear Chinese influence with this dish but with a subtle twist to make it firmly Thai. Enjoy slurping your way through your bowl of giew nam, just make sure there's enough for a second bowl!

For 4 bowls of giew nam use:

  • A pack of wonton dumpling skins (I buy them frozen but leave them to slowly defrost still sealed in their packet throughout the day)
  • around 300g of pork mince
  • a fist size chunk or thereabouts of napa cabbage, very finely chopped
  • 3 cloves garlic, finely chopped
  • a few springs, stalks and roots of coriander
  • a spoonful of oyster sauce
  • a small splash of soy sauce
  • a big pinch of black pepper
  • 3 spring onions, sliced finely
  • 300ml of chicken stock
  • half bulb garlic, cloves peeled and chopped finely
  • a big glug of vegetable oil for frying the garlic

Make a quick paste out of the 3 garlic cloves, coriander and black pepper and mix this well with the pork mince. Add in the oyster and soy sauce and then the chopped napa cabbage and mix into a smooth paste.

Take up a wonton skin and dipping your finger into a small cup of water, wet lightly around the edges of the skin. Place a walnut sized ball of the pork mixture in the middle and press the sides evenly together, sealing in the meat- if you want to be fancy, try pleating the edge! Leave them to one side for now...

Heat the vegetable oil in a small pan on a fairly low heat. Add in all of chopped half bulb of garlic- it should gently sizzle. Cooking it over a low flame will take about 5-6 minutes to turn the garlic crispy and light golden brown. Use a slotted spoon to scoop out the garlic and drain onto kitchen paper.

Heat a large pot of water until boiling and working in batches, gently place the prepared dumplings into the water. As they cook, they will rise to the surface. Three minutes should do it.

Scoop them out and place to one side on a large plate. Don't try and drain all the water off them- keeping them in some of the residual hot water will stop them sticking to the plate and each other.

Heat the chicken stock and when ready to serve, quickly heat the dumpling up in the stock for a couple of minutes before ladling out a helping of the broth with 8 or so dumplings in. Sprinkle over the chopped spring onions and a good helping of the crispy fried garlic. 

Don't forget to add chillies or rice vinegar if you would like and eat as the Thai's do with soup dishes- use a spoon for the broth and chopsticks for the noodles (or wontons in this case)


Wednesday 11 November 2015

Gaeng Om Gai (Herbal Chicken Curry)


Gaeng Om is the ultimate meal if you are feeling under the weather, if you're eating light and fresh or it's dark, cold and raining outside. It's light but filling, fresh tasting but complex and is versatile and quick to make. It's also not exactly a curry (though it does start with a paste) and is more broth like so it can be eaten with rice or alone as a soup. Like other northern Thai dishes (jungle curry, hanglay/northern curry) it doesn't use any coconut milk.

For 3-4 portions, use:

  • 2 large lemongrass stalks, peeled and finely chopped
  • 4 shallots, peeled and chopped
  • 4 large garlic cloves, peeled and chopped
  • 3 red chillies, chopped
  • a chunk of galangal, finely chopped
  • a small handful of lime leaves, ripped up
  • a few dried red chillies
  • 2 small chicken breasts/ 4 thighs, trimmed of fat and sliced into thin pieces
  • a handful each of dill and Thai sweet basil
  • 3 spring onions, chopped in a few pieces
  • 3 or 4 shiitake mushrooms, stems removed and sliced
  • a large splash of fish sauce
  • 300ml of chicken stock
Start by making a paste of the first 5 ingredients by pounding them up in a mortar. It'll take some time (10-15) but stick with it and you should have a fairly smooth paste by the end of it.

Heat half the chicken stock in a large pan and add the paste, heat until fragrant and some of the rawness is cooked out. Next add the chicken and mushrooms and cook for around 10 minutes until the chicken is fully cooked. Next in goes the dried chillies, lime leaves and fish sauce and the remainder of the stock; the consistency you're looking for should be broth like, rather than curry sauce so add a little more water if needed, or reduce down if it's a bit too watery. When the gaeng om has reached the desired thickness, add in the spring onions and herbs... 

(The observant among you will notice I haven't used Thai basil but tarragon; unfortunately there was none to be found when I made my gaeng om and tarragon is the best substitute to my mind with its anise flavour- never mediterranean basil which so many UK restaurants resort to- ugh)...

Back to it- once the herbs and spring onions have gone in, you can turn off the heat and simply stir them through the broth, they'll wilt quickly. Serve either with rice or a big spoon and feel gaeng oms healthiness sink in!


Thursday 5 November 2015

Ba Mee Moo Daeng (Red Pork & Egg Noodles)


If I'm honest, I've always been more of a fan of egg noodles than wide rice noodles which is unfortunate since rice noodles are much more common in Thai food than egg noodles which originate from China. So this Chinese influenced dish is one that makes me very happy. 

I took another trip through to Liverpool the other day and was excited to pick up a very long packet of fresh egg noodles in a Chinese wholesalers there so this dish NEEDED to be made! It's another classic street food dish and as ever, with all Thai street food and especially with noodles, it's fully expected that you will want to add your own flavourings to the finished dish. Just a note regarding the colour- I'm not a fan of artificial colouring and as such, the red on the pork is much more subtle than some luminous versions you can find that use food colouring to achieve a bright red shade.

For 4 portions, use:

  • 1 large pork tenderloin
  • 100ml of light soy sauce
  • 25ml of dark soy sauce
  • a big shake of Chinese 5 spice (ground fennel, cinnamon, cloves, szechuan pepper & star anise)
  • fresh egg noodles (hard to give a specific amount- use your judgement!)
  • 2 big handfuls of leafy/ crunchy green veg- choi sum, bok choi, pak choy etc.
  • 4 cloves of finely chopped garlic
  • 3 (or more) chopped red chillies
  • a big splash of rice vinegar (the clear sort)
  • a splash of fish sauce
  • a splash of vegetable oil
  • some sprigs of fresh coriander

Begin by marinating the pork loin in a bowl in the mix of light and dark soy and 5 spice. Let it marinate for an hour then lift the loin out, placing on a baking tray and cook in the oven at 160 degrees celsius for around 20 mins. Use your discretion, if you've used a very large large loin, it may take longer.

While the pork cooks make the sauce; mix the vinegar, fish sauce and chillies. Also make the garlic oil; heat the oil and when medium hot, fry off the chopped garlic- only lightly as it's more to flavour the oil. Get a large pan of water on the boil.

Back to the pork. Although not advised, I do prefer my pork to be slightly pink on the inside so if you want it fully cooked, allow 5-10 minutes more. Leave it to rest and cool down for a bit then cut the loin into equal slices- about  6-8mm is perfect if you want to be specific.

When the water's at boiling point, drop in the noodles- if you use fresh they won't take long- 2/3 minutes should do it. Quickly scoop them out of the water and toss the noodles in the garlic oil so they won't stick. Throw the green veggies into the leftover boiling water and blanch for a minute (no more) before draining.

Plate everything up- flavoured noodles, a few slices of pork, some of the vegetables and pour over a generous splash of the sauce. Give the noodles a good mix and eat alongside a few stalks of coriander.


Monday 2 November 2015

Pla Neung Manao (Steamed Lime Fish)


When my best friend told me her Dad had been fishing and she had a trout for us I was over the moon. We'd been promised fish before though usually they never materialised but this time- there it was. When I saw it, I was taken aback by just how big it was- most supermarket trout end up around 1 foot tops but this fella was more like two feet- we wouldn't be going hungry!!

The only fitting way to treat such a beautiful fresh fish was to keep it whole and enjoy it with a vibrant, fresh tasting sauce that wouldn't swamp the mild tasting trout. 'Neung' means to steam but this in itself presented a substantial problem- how to steam such a large fish; there was no way it was fitting in a steamer and it was even too big for my large oval casserole dish. In the end it was placed on a baking rack, in a roasting tray sat over an inch of boiling water filled from the kettle. A tight cover of tin foil, kept up off the skin allowed the whole fish to steam evenly.

And what an amazingly tasty trout it was: a very light flavour, meaty texture and the sauce complemented it beautifully. This is about as healthy as food gets- no guilt whatsoever with this meal! Serve with rice for a full meal.

For 2-4 people use:


  • a large trout ( as fresh as you can get and of a size to suit your needs!)
  • a large bunch of coriander, just over half left to decorate,the rest finely chopped
  • a few chopped red chillies (to suit your taste- I've used 3 in the sauce)
  • a bulb (yes, a bulb) of peeled, finely chopped garlic
  • 50ml of fish sauce (nam pla)
  • juice of 2 juicy limes
Steam your fish using your chosen method depending on it's size and whatever you have in your kitchen that will so the job! Check periodically to see if it's cooked to your liking.

While it cooks, make the 'sauce seafood' (Thai's do actually say 'sauce seafood', they don't translate it to nam talay or similar). Mix the rest of the ingredients and have a taste- it should be predominantly sour but salty and chilli flavours not far behind. Some add some sugar, I prefer not to.

Plate your fish (this is the biggest I had) and serve with the coriander, pouring over the sauce.


Tuesday 27 October 2015

Khai Yat Sai (Stuffed Omelette)


There's not many foods more accessible, comforting and on your plate as quick as an omelette. This omelette goes one over on other omelettes; it's stuffed with a light pork and vegetable mix and for a filling meal rather than just a light lunch or quick snack, serve with rice. It's also a very gentle introduction to Thai food, ideal for children or those who don't eat very spicy hot foods. One recommendation- make sure you have a very good non stick wok (I didn't, but that's another story...)

For one portion use:


  • 4 eggs, beaten
  • a small handful of pork mince
  • a handful of diced vegetables (I used carrot and yellow pepper)
  • 1/4 white onion, diced
  • 2 cloves garlic, finely chopped
  • a small splash of oyster sauce
  • a small splash of soy sauce
  • a small splash of fish sauce
  • a big pinch of ground pepper
  • vegetable oil for frying
  • some sprigs of coriander (optional) for serving
  • chili sauce/ sriracha (optional) for serving

Heat a small drizzle of oil in a pan and when hot, fry the garlic for a few seconds then add in onion and soften for a few minutes. Now put the pork mince in. Stir fry until almost cooked through before adding in your choice of veggies, stir frying for a minute before adding the soy and oyster sauces and pepper. Fry until any remaining liquid has evaporated and your mixture is fairly dry. Pop the filling to one side.

Now mix the fish sauce in with the beaten eggs. Heat some more oil in a wok to a high temperature and make the omelette; swirl the egg mixture around the wok to create as large and thin an omelette as possible. (This is the point I discovered my non-stick wok had lost a lot of it's non-stickiness). When the omelette has fully set and is starting to crisp, heap the prepared filling into the centre of the omelette and fold each side in, then the top and bottom edges, so the filling is enclosed in the omelette like an envelope. Serve by tipping the omelette upside down onto a plate so the folds sit tucked underneath.

Tuesday 20 October 2015

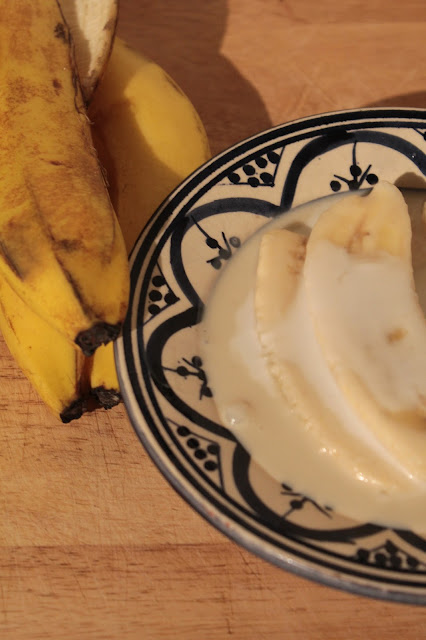
Gluay Buad Chi ( Bananas in Coconut Milk)


This is quite possibly the easiest and quickest Thai dessert you'll ever make. It can be on the table in just 5 minutes and uses just four ingredients. The name 'Gluay Buad Chit' literally means 'bananas becoming nuns! In Thailand Buddhist nuns wear white rather than the saffron robes of the monks so maybe the dish is a visual reference to the name. Serve warm for a lovely comforting dish that everyone will enjoy.

For two people use:
  • Two bananas- cut each into 4 pieces; cut lengthways and crossways
  • A 400ml can of coconut milk
  • A handful of sugar
  • A tiny pinch of salt
In a pan gently heat the banana pieces in the coconut milk. Keep just a little of the thicker coconut cream back for dribbling over at the end. When the bananas have softened after a few minutes, pop in the sugar and salt and stir gently until dissolved, taking care not to damage the bananas.

Serve and dribble over the last bit of coconut cream

Friday 16 October 2015

Khao Pad Tom Yum (Hot & Sour Soup Flavour Fried Rice)


Apparently this Thai dish was all the rage a few years back when it became rather fashionable to mix together classic Thai dishes into one combined meal. Take Tom Yum Goong (Hot & Sour Prawn Soup) and Khao Pad (Fried Rice) and mix the flavours together to create a quick, filling, fresh and vibrant tasting rice dish.


For two people use:

  • 3 cups of cooked and cooled white rice (left over from yesterday is ideal)
  • a large handful of small prawns/shrimp
  • a few stalks of green leafy veg (such as morning glory or pak choi) or substitute mushrooms or another veg of your choice
  • 1 stalk lemongrass, finely chopped
  • 4 large cloves garlic, finely chopped
  • a 1 inch piece of galangal, peeled and finely chopped
  • 5-6 kaffir lime leaves, stem removed and ripped into pieces
  • 3-4 small chillies, red, orange or green
  • juice of 1 lime
  • a big splash of fish sauce
  • a heaped teaspoon of nam prik pao (roasted chilli paste)
  • a handful of fresh coriander, some chopped, some left as stalks
  • vegetable oil for frying

Heat a splash of oil in a wok until hot and fling in the garlic, stir frying for a few short seconds. Next add in and briefly fry the flavouring herbs: galangal, lemongrass, kaffir lime and chillies. Next in goes the nam prik pao, move it around and cook out the paste for a moment. Next your vegetable choice, give it 20 seconds or so stir frying before the prawns go in for another 30 seconds or so of frying.

Now it's time to carefully tip in the cool, cooked rice and mix everything well, coating the rice in the nam prik pao. Finally pop in the fish sauce, squeeze over the lime and mix in the chopped coriander before giving everything a good final mix through before serving alongside plenty of fresh coriander.


Sunday 11 October 2015

Gai Pad Pong Karee (Chicken Fried with Curry Powder)


Soft chicken and egg pieces, a few crunchy vegetables and a mild yellow curry powder stir fry served over rice; this is great comfort food, just what you want on an autumn evening. 

As far as stir frys go, this is a great one as you won’t need to look hard for the ingredients (apart from possibly the nam prik pao- roasted chilli paste) and you can be eating it in around 20 minutes. It’s another classic Thai street food dish (although it’s often made into a luxury version by being served with crab or other seafood). Evaporated milk (although not a common ingredient in savoury recipes in the UK anymore) still crops up in Thai food quite regularly (such as tom kha gai soup) and is interchangeable with coconut milk (though obviously will give a less sweet flavour whilst still retaining the right creaminess). Mild curry powder gives it it’s bright yellow colour and makes it popular for little ones too.
For 4 portions use:
  • 6 medium sized chicken thighs (skinned, boned and trimmed of fat), cut into small pieces
  • 2 eggs, lightly beaten
  • 100ml of evaporated milk
  • a heaped dessertspoon of nam prik pao (roasted chilli paste)
  • a heaped dessertspoon of mild curry powder
  • a large handful of crunchy veggies (I used some green beans and green/yellow bell peppers)
  • 1 onion, sliced
  • a few red chillies, chopped into a few bits (optional)
  • 3 cloves garlic, finely chopped
  • a big splash of light soy sauce
  • a big splash of oyster sauce
  • vegetable oil for frying
Prepare the sauce first as it’ll all get poured in together- mix in a bowl the eggs, evaporated milk, nam prik pao, curry powder, soy sauce and oyster sauce. This will make things much quicker and easier.
In a wok, heat the oil until reasonably hot and stir fry the garlic for a few seconds before you add in the onion. The onion needs a minute just to soften, we’re not looking for colour. Now add the chicken. Cook the chicken until it’s more or less completely white and cooked through. Toss in the rest of the veggies and stir fry for a further minute then pour in the sauce. It’ll take a few minutes but as the egg cooks you’ll get something that resembles a lightly scrambled texture; i.e some solid and fluffy bits and still a little liquid- that’s the consistency you want. Don’t worry about it looking slightly curdled- that’s how it’s meant to be!!
Serve over hot fluffy rice and enjoy- this dish is like having an warm blanket wrapped around you.

Friday 9 October 2015

Thai Soup Collection


It’s almost that time of year again- soup season!! Bringing you my recipe collection of four Thai soups I have cooked over the past year or so.

From top-bottom:
Tom Kha Gai (Galangal Chicken Soup)
Tom Saeb (Hot & Sour Pork Rib Soup)
Tom Yum Boran (Ancient Soup)
Tom Yum Goong (Hot & Sour Shrimp Soup)

Monday 5 October 2015

Gai Yang Khamin (Turmeric Grilled Chicken)


So lots of you liked my sushi post yesterday? thanks for that; I do sometimes wonder whether I should include more than Thai food in this blog as we eat Asian food probably 4-5 nights a week, I guess I just know way more about Thai than any other food culture. I may start throwing in the odd non- Thai Asian post from time to time.
So it’s moving towards Autumn/ Wintertime again and the which makes taking pictures in poorly lit kitchens quite tricky so sorry for the washed out pic. It did taste really good though and was really easy to do. I’ve done a gai yang post way back here but a slightly different recipe and without the addition of turmeric.Turmeric is supposed to have cancer preventative properties so is a great food to eat.
For two portions use:
  • 4-6 chicken thighs, skinned and boned, trimmed of excess fat
  • a small handful of coriander roots or stalks
  • a teaspoon of black peppercorns
  • half a bulb of garlic
  • 2 fingers of fresh turmeric
  • a big splash of light soy sauce
and the sauce is simply:
  • Juice of a big lime
  • a big splash of fish sauce
  • a few stalks of chopped coriander
  • a big pinch of chilli flakes/powder
  • a teaspoon of toasted rice powder (dry fry rice and grind up)

Pound all the solid ingredients in a pestle and mortar until you have a chunky paste. Put this paste along with the soy sauce and chicken into a bowl, mixing well and leave to marinade for as long as you have, ideally an hour or so.
Heat the grill on a medium heat (not too hot otherwise the spices burn and the chicken stays raw!) and grill until cooked through, with a slight char and some crispy bits. Serve with (ideally! sticky rice, a som tam salad and the spicy dipping sauce

Sunday 4 October 2015

Homemade Sushi Night!


Having a change from Thai (just a brief one- promise!) Homemade sushi with the best ever tasting sushi grade fish from Kazari

Monday 28 September 2015

Sankaya Fakthong (Pumpkin Custard)


With so many of you posting beautiful and inviting images of falling leaves, misty mornings and Halloween ideas it only seemed right that I jump on the pumpkin bandwagon and give my spin on the seasonal dessert (in traditional Thai style of course) with a sankaya (steamed custard pumpkin.
Pumpkins aren’t a popular food choice here in the UK, most are reserved for Halloween lanterns and those that are eaten are almost all destined to become savoury dishes- roasted and risotto’d. You lot in the USA definitely have the right idea using pumpkin in desserts and cakes and Thais seem equally happy to use them as a sweet ingredient too.
Just a quick note on pumpkins- Thailand’s main choice is the kabocha squash. I don’t recommend using a traditional orange halloween pumpkin as they’re too stringy and watery. I am lucky enough to have access to a fantastic food co-operative shop called Single Step where every year a motley selection of organic squashes and pumpkins emerge at this time.
For 4 portions (perhaps more!) use:
  • a small edible pumpkin (fits comfortably into both hands) I used a gem squash
  • 4 eggs
  • 300ml of coconut milk
  • 100g palm sugar (or light brown sugar)
  • a small splash of vanilla extract
  • a pinch of salt
Prepare your pumpkin/squash by cutting around the stalk in a small square and carefully prize out the stalk in one piece. Use a long spoon and spend a bit of time thoroughly cleaning out all the seeds and string inside the pumpkin. Once it’s empty- rinse it out under cold water to get rid of all the last bits then pat dry.
In a pan, gently heat the palm sugar and coconut milk, stirring lightly over a low heat until the sugar has fully dissolved. Add in the salt and vanilla extract then leave the mix to cool down fully.
in a separate bowl, beat the eggs and pour them into the coconut milk mix, blending thoroughly. Pour this mixture into the hollowed out pumpkin and set in steadily inside a steamer over boiling water. There will probably be some mixture left over- I steamed the rest in a ramekin dish.
Depending on your pumpkin’s size and thickness and the type of steamer you use, it will take between 45 mins and 75 mins to slowly soften the pumpkin and set the custard inside- don’t rush it and check it is done using a metal skewer- it needs to come out clean if the custard is set.
Use a large sharp knife to cut up the pumpkin into fat slivers.

Sunday 20 September 2015

Pla Pad Prik Thai Dam (Fish Fried with Black Pepper)


Deep fried fish, lots of garlicky spices and crunchy vegetables- you can’t really go wrong here. I suspect this is one of these dishes that may have started out as tourist food but has ended up being just as popular with the Thai people.
It’s a quick easy to make dish that doesn’t use any obscure or hard to track down ingredients. It’s a nice contrast to have two kinds of heat from the smoky black pepper and the fiery chillies. It didn’t last long on our plates anyway!! Serve with fluffy white rice.
For two portions use:
  • a large, skinned sea fish fillet (I used haddock- pollock, coley, catfish or ling are also good) cut into large chunks
  • 1 & ½ bell peppers (whatever colour you fancy)
  • 1 onion, sliced into strips
  • 2 spring onions, cut into large pieces
  • 4/5 cloves of garlic, chopped fine
  • 2-3 small red chillies, chopped fine
  • a dessertspoon of black pepper, ground
  • a cup of plain flour
  • a big splash of oyster sauce
  • a big splash of light soy sauce
  • vegetable oil for deep frying/ stir frying
Start off by coating the chunks of fish in the flour. Heat a deep pan or wok and when hot, gently drop in the fish and deep fry until lightly golden and crisp- roughly ¾ minutes. Cook in batches if needed so the pan isn’t overcrowded and drain on kitchen paper.
In a clean wok, heat a splash of oil until really hot and throw in the sliced onions and peppers, stir frying for 3 minutes and allowing the bottoms to get a little char. Throw in the spring onions, garlic, chillies and ground pepper (it’ll make you cough!) stir frying for another 30 seconds before adding in the fried fish and both sauces. Briefly stir fry (gently so the fish doesn’t break up) so everything is coated in sauce and serve with rice.

Tuesday 15 September 2015

Siam Smiles Cafe, Chinatown, Manchester


So I’ve finally got round to posting my review of Siam Smiles, the Thai cafe in the basement at 48 George St in the heart of Manchester’s Chinatown. This was the second visit, we ‘discovered’ it after making it’s acquaintance in April and felt a follow up visit was much needed.
I’ve eaten at quite a lot of Thai restaurants in the UK and the majority follow a very safe formula; using pre bought red, green and massaman pastes, overly sweet and sticky pad thai noodles and a general lack of fresh Thai herbs and vegetables (such as my particular bugbear- substituting Mediterranean basil for sweet or holy Thai basil).
This cannot be said of Siam Smiles, despite only having a few tables alongside the supermarket produce, you know you’re going to get real Thai street food. The condiment caddy and pot of nam prik pao is a good indicator you’re going to be eating very well.
On this occasion I ordered some simple comfort food- khao moo daeng (red pork over rice) and the som tam pla ra (fermented fish sauce papaya salad) with added crab. The rice plate also came with a warming bowl of herbal broth which was a nice touch and a palate cleanser.
There is a clear Chinese influence with khao moo daeng- the red pork and sauce not too distant from char sui/hoisin. The pork was lean and firm and had a great depth of flavour with star anise coming through quite strongly. The cucumber and boiled egg added some lovely texture too; definitely a unfussy and comforting dish.
The som tam pla ra was a different beast altogether. Those who follow my blog know I love som tam and make it usually once a week at home. This was the first time I had encountered the pla ra version and it’d been on my ‘to try’ list for quite some time. However for my taste buds I think it was a step too far. The salad itself was great, crunchy green papaya, not padded out with large amounts of carrot, cherry tomatoes, long beans and I loved hearing it being pounded up in the pok pok in the kitchen. The salad also had pounded up small crabs (for the flavour rather than meat) and contained slivers of pickled limes which are delicious. The pla ra isn’t how I expected it to be, it’s not that it’s especially fishy, though it is strong, it made me think more of the bottom of a pond. My husband however, preferred it to regular som tam. I was pleased to see it arrive with the customary cabbage wedge.
The portions are a perfect size, plenty enough to fill you up but not wasteful and the prices are good- £7-£8.50 for most plates. The staff are also really friendly and helpful, answering some of my questions about ingredients.
We’ll most certainly be back again, we’re slowly making our way round the extensive menu and will continue pushing our flavour comfort zones in our quest for authentic Thai street food!
https://twitter.com/SiamSmilesCafe
https://www.facebook.com/SiamSmilesCafe

Tuesday 8 September 2015

Khanom Jeen Nam Ya (Fish Curry Noodles)


Typically this is a breakfast or lunch dish in Thailand but if you make it for your evening meal I don’t think anyone will mind! This is typical southern Thai street food and is another of those dishes that can be adapted depending on what is available from the market (or in my case, my local Asian food store) on the day. Don’t feel you have to use the same accompanying vegetables. Eggs, pickled cabbage and stink or wing beans are all popular too.
The basic fish curry is served over soft rice noodles and served alongside a selection of crunchy raw vegetables, herbs and crispy dried chillies. The slippery noodles and soft silky sauce contrast really nicely with the beansprouts and green beans and it is both fiercely hot, fishy and salty but balanced out with rich creamy coconut and pepped up with lots of citrus flavours.
For 3-4 portions use:
  • A pack of fresh rice noodles (typically thin ones), separated into individual strands or if using dried, soaked until fully flexible.
  • 300g of skinned & boneless fish
  • a big splash of fish sauce
  • 400ml (a can) of coconut milk
  • 200ml of fish ‘stock’ (boiling water left over)
  • about 8 kaffir lime leaves, torn up
For the curry paste:
  • 2 fingers of fresh turmeric
  • 2 fingers of krachai (finger root/galingale)
  • 6 cloves garlic, peeled
  • a small handful of dried red chillies (6-12)
  • a big knob of galangal
  • 3 Thai shallots
  • a teaspoon of black peppercorns
And to accompany:
  • 2 heaped handfuls of beansprouts
  • a handful of green/long beans, chopped into pieces
  • a few handfuls of whatever fresh Asian herbs you can get- sweet basil would be ideal (I couldn’t get it) so coriander was used here
  • several dried red chillies (lightly toasted to crisp them up)
  • several slices of cucumber

Start as ever, by making the paste. Pound up all the ingredients, bit by bit, not putting too much in the mortar at once. Start with the tougher ingredients, working through to the softer ones and keep working away until a smooth red paste is reached- 15/20 mins probably. Pop the paste to one side, you need the mortar again…
While doing this, gently boil the fish in water. If you use pre filleted skinned fish, it’ll not take long, perhaps 10 mins. If you use whole fish, maybe 15 minutes. After boiling, scoop out, straining off any drips of water and spend some time as needed to remove any skin and bones. Keep the fishy water for the next step. Put the prepared fish into the mortar and gently pound it, until you have a smooth paste.
Heat a wok and pour in all the coconut milk, gently heating it through. Add in your newly made curry paste and stir through. Let the curry develop for 5 minutes before adding lime leaves, fish sauce and the pounded fish. Add in some of the fish stock as needed- the curry should still have a fairly thick (yoghurt like) consistency. Cook on low heat for a further five minutes. In the last 5 minutes, heat through the fresh rice noodles in hot water until soft and flexible and drain, plating up alongside your selection of vegetables. Ladle over the nam ya curry.

Wednesday 2 September 2015

Roti Mataba (Folded Pancake)


Roti Mataba is the name used in Thailand whilst in Malaysia they are known as Roti Murtabak. Roti are found mainly in the south of Thailand, near the Malay border where there is a larger Muslim population.


Unlike a UK pancake (which is made from a batter), roti are made from dough, rolled out incredibly thin and pan fried to create a flaky, chewy flat bread. Really skilled cooks will stretch and slap the dough out until it becomes paper thin but this is very difficult and not totally necessary!


Roti Mataba are made in two parts- the curried chicken filling (though you could vary this with pretty much any meat/vegetable/egg/sweet filling) and then the enriched dough.

They are absolutely delicious and well worth taking the time to make (and eat them).
For 5 rotis (a snack for 2 people or main meal if served with another dish) use:
Dough-
  • 450g plain (all purpose) flour
  • 1 beaten egg
  • 1 cup water
  • 25ml milk
  • a dessertspoon of sugar
  • pinch salt
  • vegetable oil for coating
Filling-
  • 3 skinless chicken thighs/1 breast, chopped into small cubes
  • 1 beaten egg
  • 4 shallots/ half red onion, very finely chopped
  • 3 cloves garlic, finely chopped
  • 2 red Thai chillies, finely chopped
  • 1 teaspoon cumin seed, ground
  • 2 teaspoons coriander seed, ground
  • 2 teaspoons curry powder
  • pinch chilli flakes
  • pinch salt
  • small splash of vegetable oil
The dough needs to be started at least 2 hours before you plan on making and eating the mataba. In a bowl sift flour, salt and sugar. Mix in the beaten egg and milk and slowly add in the water- you may not need the whole cup of water. The dough shouldn’t be wet but it certainly doesn’t want to be dry. Knead it well on a floured surface until it feels soft and springy. Pop it back in the bowl, covered and leave it for at least an hour while you make the filling.
For the filling, heat the oil in a pan, when it’s hot add in the shallots/onion and fry until they have some colour. Add in the garlic and chicken (or whatever meat/veggies you’re using), toss in the spices, salt and chillies, frying briefly before pouring in the egg and scrambling it into the mixture. Once cooked, it can be left to cool until the dough is ready.
Back to the dough again. Briefly knead before cutting and rolling into golf ball sized pieces. Coat each ball with vegetable oil, cover with cling film and leave them for a further hour.
After an hour, roll each ball as flat as you can manage- the oil will stop it from sticking. Heat a large flat frying pan and add a small dribble of oil. Working quickly, place a flattened piece of dough in the pan and it will start to cook straight away. Place a heaped tablespoon of the filling mix into the centre of the roti and fold in the sides, top and bottom to cover. Flip the roti parcel over to cook (and somewhat seal) the edges. Each roti takes about 2 minutes to cook. Add and small drizzle of oil between each one
Cut in half to serve and serve alongside a cucumber pickle or simply a few slices of cucumber.

Sunday 23 August 2015

Gaeng Hed Fang (Straw Mushroom Curry)


Sometimes you just want a simple, healthy, quick to make dish. This was just a it- a quick mushroom and bamboo shoot ‘curry’ with lots of herbal flavours. Satisfying and comforting, it would be a great cold weather dish. I’m a big fan of texture in food and this was lovely, crunchy bamboo shoots contrasting with the slippery mushrooms.
This is northern Thai cuisine and starts with a simplified red curry paste. It has predominantly a salty/sour/hot flavour and if you don’t want it to be vegetarian/vegan, you can definitely add some meat into the mix.
For two people use:
  • A drained tin of straw mushrooms, halved
  • 150g or thereabouts of drained sour bamboo shoots (or use regular plus the juice of half a lime) cut into strips/small pieces
  • a big handful of Thai sweet basil (bai horapha) leaves
  • 2 spring onions, chopped
  • 100ml of stock
  • a big splash of light soy (or fish sauce if not needed to be vegan/veggie)
  • a small amount of vegetable oil for frying
For the paste, pound together:
  • 1 lemongrass stalk (peeled and chopped first)
  • 5 dried red chillies, ripped up
  • 5 cloves of garlic, peeled
  • 4/5 shallots, peeled and chopped
  • a big pinch of salt

Heat the oil in a wok and when hot, briefly fry off the paste for 30 seconds or before adding the stock and soy (or fish) sauce. Pop in the bamboo shoots and mushrooms and let it reduce a little (say 5 minutes).
Just before serving, sprinkle in the basil leaves and spring onions.

Wednesday 19 August 2015

Tub Tim Grub (Crunchy Rubies)


The blog is definitely overdue another Thai dessert, it’s nothing personal, it’s just I’m a bigger fan of savoury than sweet. However, we’ve been having some warm days lately so a cool and crunchy pudding seemed in order and this dessert was one I’ve been meaning to get round to for ages- it’s a really popular well known hot weather dish in Thailand.
‘Tub tim’ can mean either rubies or pomegranate in Thai- it’s easy to see why this dish shares that name. The cool, sweet coconut milk is an awesome contrast to the jelly coated crunchy water chestnuts.
I only had tinned water chestnuts and coconut milk available to me but if you can get fresh, I would definitely use them.
For two people use:
  • a handful (roughly 12) peeled water chestnuts- note: if using canned, drain and leave them to soak in fresh water for 12 hours, changing the water over several times to reduce the ‘tinned’ flavour. Cut each chestnut into 4 equal bits
  • 1 cup of tapioca flour
  • half a can of coconut milk (200ml)
  • 100ml of water
  • a teaspoon of red food colouring, mixed with a small splash of water
  • a tablespoon of sugar
  • crushed ice
Put the water chestnut pieces into a bowl with the red food colouring and water. Turn them gently and leave them to soak for 15 minutes.
Get a pan of water boiling
Drain the water chestnuts of excess colouring and put them in another bowl with the tapioca flour and coat them well.
Shake off the excess flour and gently lower them into the boiling water- you’ll see the bright red colour become visible. After just two minutes, they’ll float to the surface. Use a strainer to scoop them gently out and transfer into a bowl of very cold water for a minute.
Dissolve the sugar in the 100ml water and add the coconut milk and crushed ice. Pour into serving bowls.
Scoop the ‘rubies’ out of the cold water, gently shaking off the water and divide amongst the coconut milk.

Monday 17 August 2015

Bangkok bomb: Deadly blast rocks Thailand capital - BBC News

Link: Bangkok bomb: Deadly blast rocks Thailand capital - BBC News

Sending my support and sympathies to all the Thai people and foreign visitors caught up in the terrible bombing attack at Erawan Shrine in Bangkok.

Saturday 15 August 2015

Yam Woon Sen (Glass Noodle Salad)


Just a quick, fresh salad here, perfect for a warm summer’s night- fresh, hot, crunchy and vibrant flavours and it can easily be substituted with whatever you have in. Also great cold the next day in a lunch box! The glass noodles are incredibly fine and have a good bite to them, they shouldn’t be mushy.
As always, I did way too much but let’s say this does 2 main meals and 2 small lunch portions…
  • 3 blocks of glass (mung bean) noodles/ or roughly 2/3 of a whole packet
  • 3-4 Thai shallots, finely sliced
  • 2-3 spring onions finely sliced
  • a small piece of lean pork (200g or thereabouts), chopped into small bits
  • a big handful of coriander leaves, torn
  • a small handful of peanuts, crushed
  • 1 stalk of celery, thinly sliced
  • 3 small red chillies, finely chopped
  • juice of 1 large or 2 small limes
  • a big glug of fish sauce
Place the noodles in a glass or ceramic bowl and pour over boiling water to soften the noodles. Leave for 5/10 mins then drain and snip them up a bit with scissors.
While the noodles soften, heat a small pan of water until boiling and drop in the pork. It’ll be cooked in just a few minutes, skim off any scum, the drain when cooked.
Mix all the cooked and raw ingredients together in a bowl well, let it sit for around 5 minutes to absorb some of the dressing.
Serve, sprinkling over some extra coriander leaves and/or peanuts if you wish.
Best served with a cold beer and eaten outside :)

Monday 10 August 2015

Miang Kham (Wrapped Bites)


Something totally different today, thanks to another trip to Siam Smiles Thai supermarket in Manchester yesterday. We had some more amazing food there and will do a write up on the next post. The main ingredient for this dish- the bai cha plu (wild pepper leaves) we picked up there, it’s something I’ve yet to come across in the UK and seeing how it’s essential for miang kham, it would have been a shame to not grab a pack at just £1.65.
Miang (wrapped) kham (bites) are made of of the glossy wild pepper leaves (incorrectly often confused with the stimulant/carcinogenic betel leaf). They have an incredible perfume and taste which I found hard to describe as they seem to be made up of so many elements. Initially they have spicy hits of star anise then something akin to kumquat with a bitter-sweet citrus note. Exciting stuff!
Into the leaves comes an assortment of sweet, sour, spicy, salty, bitter, fishy, chewy and crunchy goodies- your mouth won’t know what’s going on- but it’ll want another one!!
This recipe will make around 20 pieces.
Start by making the sauce:
Bash together in a mortar:
  • A small handful of dried pink shrimp
  • A small handful of peanuts, toasted in a wok until lightly browned
  • A small handful of fresh or dried coconut, toasted in a wok until lightly browned.
Then pour this mix into a small saucepan with
  • A very big splash of nam pla (fish sauce)
  • Half a cup of water
  • A tablespoon of palm or light brown sugar
Cook this mixture down until it’s quite thick and sauce-like. While it’s cooking, prepare the fillings…
  • A big handful of peanuts
  • 6-10 red and/or green small chillies, finely sliced
  • A big nobble of ginger, peeled and diced fine
  • A big handful of fresh or dried coconut, toasted in a wok until light brown
  • 8-10 peeled and diced shallots
  • Half a lime, skin left on (if you like the bitterness), peeled otherwise, cut into very small segments
  • A handful of small dried pink shrimp
Serve everything together, make a cone shape of the stalk end of the leaf, load up with a couple of pieces of each of the fillings then spoon over some sauce, roll the leaf up and experience a mouthful of flavour madness!

Thursday 6 August 2015

Nam Prik Ong (Spicy Pork Dip)


Nam Prik’s come in many varieties- they are sauces, dips, snacks and starters and nearly always served with a variety of fried things and crispy vegetables to dip in. They come mainly from the north of Thailand and mix together, fresh, sour, chilli, smoky and fishy flavours; in short an unusual and exciting blend of flavours.
To make a bowl of nam prik ong you’ll need:
  • around 300g of pork mince
  • 5 or 6 cherry toms, halves
  • ¾ spring onions, sliced
  • 5 shallots, sliced thin and fried in oil until crispy
  • 3 shallots, chopped
  • 4 cloves garlic, chopped
  • 6 dried red chillies, ripped up
  • 1 egg
  • a small blob of kapi (shrimp paste)
  • a splash of fish sauce
  • a large handful of coriander, ripped up
  • vegetable oil for frying
and to serve along side…
  • Thai prawn crackers and/or pork cracklings
  • cucumber slices
  • crunchy veg like long beans, cabbage
  • a few small red and green chillies if you’re feeling brave
Start by making a paste of pounded up garlic, half the coriander, the shrimp paste, the 3 chopped shallots and dried chillies until it’s smooth and of the same consistency.
Heat a small amount of oil in a pan, when it’s hot, start frying the pork mince for a few minutes before adding the paste and frying- it will be quite pungent! Add in the egg- you’re not aiming for fluffy like with fried rice, the egg should be mixed through to give the pork and paste a smoother, dip like consistency. Add a splash of water if needed to keep it loose. Throw in the halved tomatoes and stir them about in the dip to crush them slightly.
Pop the dip in a bowl and sprinkle over the spring onions, other half of the coriander and the crispy shallots.
Serve alongside all the extras